
Wednesday, March 28, 2012
Tuesday, March 20, 2012
For the love of George...

George.
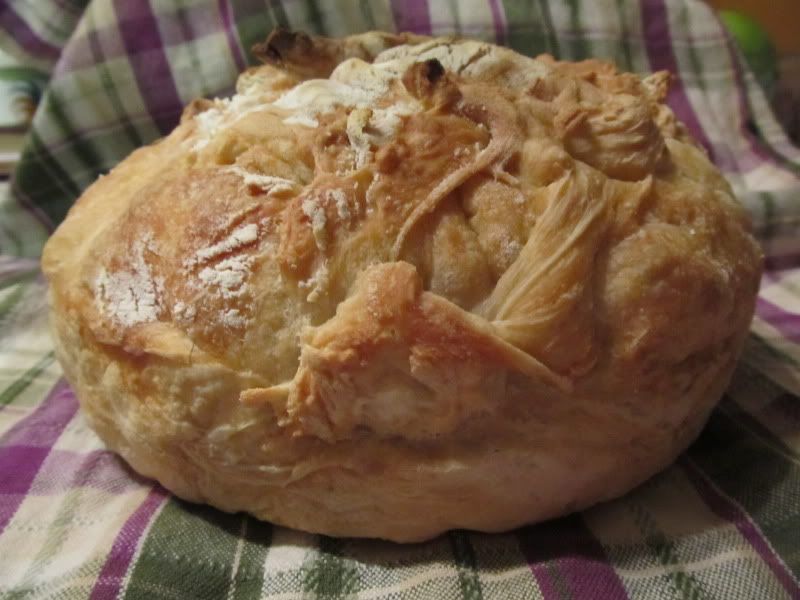
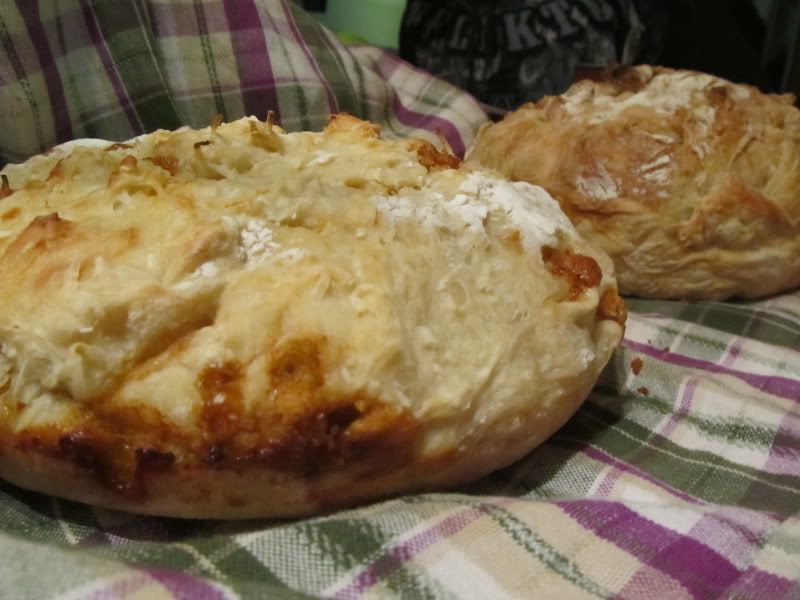
I love the distinctive flavor that a sourdough gives baked goods. I will confess, right up front, that I made George the easy way, with water, flour and a bit of commercial yeast. The hard way involves essentially combining flour and water and hoping that the yeast in the fresh flour are built up to the point that they begin to ferment, creating lactic acid and the distinctive sour taste. Another way is to add some "old dough" or a bit of a stable, established starter to water and flour. I didn't have any previous starter, but I found a recipe for a starter in some of my old cook-books, and made my own.
I mixed 2 cups of flour, 2 cups of water and I pkg dry yeast in a plastic bowl. I let it is sit overnight in my pantry, and in the morning it was bubbly and frothy, with a clear fermented smell emanating from the bowl.
Once it was ready, I took 1/2 a cup of the starter and put it into a clean container. It's important not to use a metal container to keep a starter in. Glass or plastic is best. I used what was left of the starter to make biscuits. They were lovely.
I'm going to post the recipes for the biscuits and the bread. In coming posts, I will add pictures of George, instructions for making the bread in the bread machine, etc.
Sourdough Tea Biscuits
1 c. all purpose flour
2 tsp. baking powder
1/2 tsp. baking soda
1/2 c shortening (I used butter. Margarine would work, too)
1 c. sourdough starter
Sift dry ingredients, cut in shortening, add sourdough starter and mix with fork until blended. Turn out onto lightly floured counter and knead lightly, pat our and cut into biscuits, bake at 400F for 20 minutes (depending on large they are, start checking them at 15 minutes.)
Sourdough Bread
To the two cups of starter, add: 4 c. sifted flour
2 tbsp. sugar
1 tbsp. salt
2 tbsp fat (lard, shortening, margarine, oil or butter)
Sift dry ingredients in a bowl, making a well in the centre, add fat to the starter and mix well. Pour into well in flour, add enough extra flour to make a soft dough, knead on floured board for 10 - 15 minutes. Place in greased pans, let rise in a warm place for 2 hours until doubled. Bake at 375f for 50 - 60 minutes (my bread never takes this long. I would check it after 20 - 25 minutes).
To feed the starter, add 1/4 c. sugar, 1 c. milk and 1 c. flour. Many recipes just require a cup of water and a cup of flour. I've been adding less sugar than the 1/4 cup, and I've fed George water instead of milk a few times. The starter needs to be fed every time it is used, after which it needs to be left alone for 24 hours. I think even if it's not used, it still needs to be fed every 3- 4 days. But it's worth the effort to use it. Especially when the bread can be made in the bread maker. And believe me, the bread and biscuits will disappear so quickly, your starter won't get bored.
Next time, there will be pictures and approximate instructions on using the breadmaker to make sourdough bread. I say approximate, because each bread-maker is different, so you may have to do a bit of tweaking and experimenting on your own. I'm also in the process of working it all out. Do I add yeast, or not? (so far, yes, but how little can I get away with?) Will I need to add extra liquid? And if so, how much? (Again, I have had to, although I'm not sure how much I've been adding because I just splash it in until it looks doughy)
Stay tuned!
Saturday, February 18, 2012
Flavor Staples - Ginger, Lemongrass & Sesame Oil
Like most people, my cupboard is full of flavors. Dried herbs and spices like basil, thyme and cinnamon, yummy flavors like cocoa and cinnamon, and spice mixes like steak, curry and Greek spices, all work together to create magic with the right ingredients and a little TLC.
Some of my favorite flavors, though, are hiding in my freezer. While I do have dried, powdered ginger in my pantry, my favorite way of using ginger is fresh ginger root, frozen and grated into all sorts of dishes. Fresh ginger root freezes really well, and keeps it's gorgeous, pungent scent and flavor when grated frozen into soups, sauces and dishes, especially noodles. In fact, ginger root is easier to grate when frozen, and it keeps forever. Okay, maybe not forever, but cetainly for a really long time. Grated ginger seriously jazzes up simple dishes like chicken soup - with broth, noodles, some chopped green onions and a bit of grated ginger, chicken noodle soup becomes instant adult food!
 Lemongrass is another intensely wonderful flavor that deserves a place in every kitchen. I bought some for a recipe last week, used a fraction of one of the stalks and froze the rest. Like ginger root, lemongrass can be grated frozen into many different dishes and soups. Anything that you can imagine adding lemon flavor to will be a perfect match for lemongrass. Again, chicken soup loves lemongrass. Add grated frozen lemongrass to plain rice or noodles, soups, cream sauces (it will add the lemon flavor without the chemical cuddling that lemon juice brings to a milk sauce), even tea.
There are many oils that serve as flavorings, such as walnut and peanut oil. Sesame oil is, hands down, my favorite. A bit of sesame oil and soya sauce brings the Orient to noodles, as well as rice. Stir fried meat and veggies are wonderful with a dash of sesame oil. It's nutty and rich, and is lovely as a replacement for butter when drizzled onto vegetables like broccoli, cabbage or bok choy.
I think the important thing is to experiment with these flavors. While they may seem a bit expensive, remember that the amount that you will buy from the market will last for a long time in the freezer or pantry. These are flavor additions, and usually only a small amount is needed. Start with a little bit, taste-test a lot and then add more if you want to. What about lemongrass in scrambled eggs? Ginger and lemongrass grated into your teapot with a few green tea bags? Lemongrass in shortbread cookies, or vanilla cakes, or in a salad? Or sesame oil drizzed onto a steak or broiled chicken breast? Really, these are flavors that could be played with indefinitely.
So, what are your favorite flavors? How do you use them to make ordinary foods taste extraordinary?
I want to know!
Some of my favorite flavors, though, are hiding in my freezer. While I do have dried, powdered ginger in my pantry, my favorite way of using ginger is fresh ginger root, frozen and grated into all sorts of dishes.


There are many oils that serve as flavorings, such as walnut and peanut oil. Sesame oil is, hands down, my favorite.

I think the important thing is to experiment with these flavors. While they may seem a bit expensive, remember that the amount that you will buy from the market will last for a long time in the freezer or pantry. These are flavor additions, and usually only a small amount is needed. Start with a little bit, taste-test a lot and then add more if you want to. What about lemongrass in scrambled eggs? Ginger and lemongrass grated into your teapot with a few green tea bags? Lemongrass in shortbread cookies, or vanilla cakes, or in a salad? Or sesame oil drizzed onto a steak or broiled chicken breast? Really, these are flavors that could be played with indefinitely.
So, what are your favorite flavors? How do you use them to make ordinary foods taste extraordinary?
I want to know!
Monday, February 13, 2012
Chuck's marmalade...w/limes?

On Saturday, Grace and I spent most of the day cleaning up and working on the apartment, so by supper time, we were hungry and ready for something special. One of the things I made was a oriental soup that I had at a restaurant last week. It was a lovely, pale broth with ginger, lemongrass and noodles. I wanted to try to recreate it at home, but it still needs a bit more work before it is perfect. And blog-able.
I also wanted to try the marmalade recipe that I had posted earlier, but with limes. I had plans to make a coconut cream pie, and I thought that a little dollop of lime marmalade on top would be awesome. Unfortuantely, lime peel doesn't respond the same way as lemons and oranges in sugar syrup. The peel was hard and inedible, although the syrup was gorgeous. Lime is hands down one of my favorite flavors, and I am thinking that a lime syrup without the peel would have worked very well on the pie.
I also have a confession to make. The coconut cream pie? I used a store-bought graham cracker crust, and a Jello pie/pudding mix. Because for me, sometimes a shortcut makes the yum-yums possible. And yum-yum, it was.
I'll keep working on the soup recipe. I also need to get into the habit of taking notes when I am eating out, so that I can keep track of flavors of notable dishes. As it is, I can't for the life of me even remember the name of the restaurant.
*sigh*
I'll get the hang of this eventually, I promise.
Thursday, February 9, 2012
Chuck's Marmalade, with Pictures
I made Chuck Hughes' marmalade on Tuesday night, and it turned out really well. It's ridiculously simple, but I took pictures anyway.
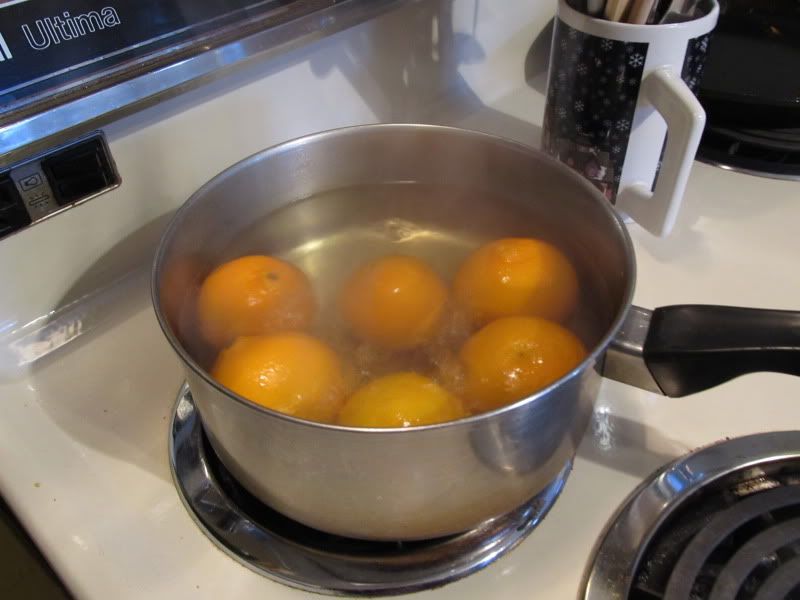
 I started off by taking 6 clementines and boiling them for about half an hour, until they were really soft. The smell in the house was lovely. I only used 6 for the first time, in case it didn't go well. But it was just enough, and made a jar of marmalade.
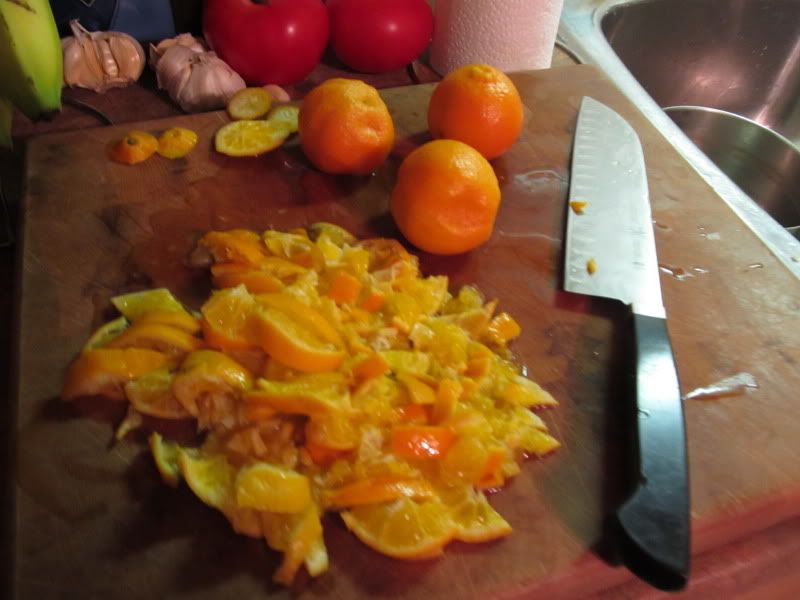
 Once they were soft, I cooled them off in cold water and chopped them up, skin and all. I did cut of the little stemmy bit at the top, but other than that, everything went in. Again, the smell was heavenly.
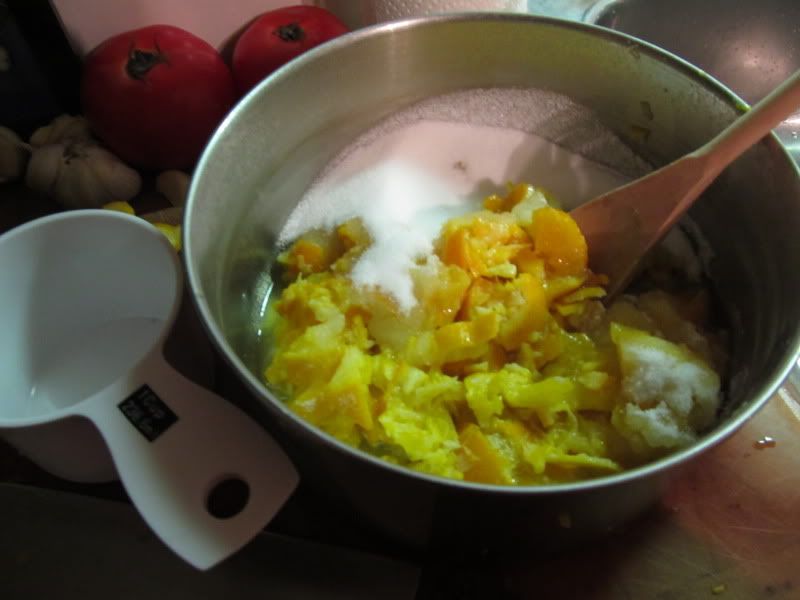
 I placed the chopped clementines back into the sauce pan and added 1 cup of sugar.
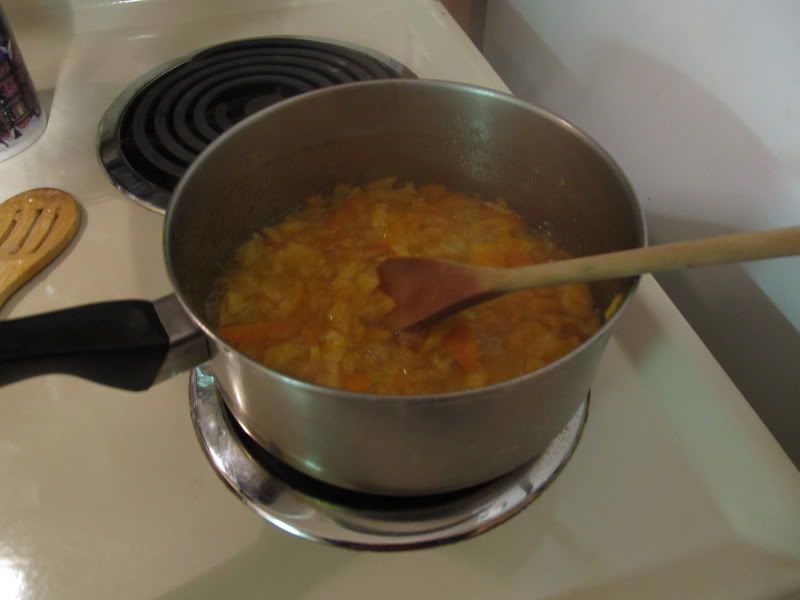
 I then cooked the mixture on medium/low heat. There was a lot going on here in the kitchen while I was making this, and so I cooked it a little too long and slightly scorched the bottom, but I would say 20 minutes or so would've done it. It still came out lovely and fragrant, with that sweet, mildly bitter taste that is classic marmalade.
 When I make it again, I will pay more attention to the cooking time, and take it off the heat when there is still a bit more syrup. Still, it is quite lovely. It is really nice on toast. Enjoy!

Tuesday, February 7, 2012
Chuck's marmalade
Yesterday I was watching Chuck Hughes' cooking show, "Chuck's Day Off". He was making all sorts of culinary wonders, but one thing that stood out to me, mostly because of it's simplicity, was a clementine marmalade. He literally just boiled a bunch of clementines in water until they were soft, chopped them up (skins and all), dumped them back into a pan, added sugar and gently boiled them until they were marmalade.
It all just sounds too easy.
So in the interest of my curiosity and love of marmalade, I bought some clementines and will be trying this marmalade recipe out.
Pictures and results will follow.
I also paid a visit to our local thrift store, on a search for kitchen goodies. I found a french fry basket which will come in handy for a future poutine project I have been playing around with. I also found a wooden pastry brush, a cork screw, and a fairly sturdy hand mixer
Wednesday, February 1, 2012
Garlic Mayonnaise
On the week-end, Grace & I were having serious caesar salad cravings. Since we didn't have any bottled dressing, we had to pull together our own. I've made homemade mayonnaise before, and I've been meaning to try roasting garlic and using it in something, so it seemed like a perfect opportunity.
For the garlic, I took a whole head and sliced the top off it, keeping it intact and just exposing the cloves inside. I actually did three heads, and saved the other two for later after roasting. I placed them in a baking pan, poured oil over them, covered the pan with tin foil and popped them in the over, at 350 F for about 10 - 15 minutes. I would normally have used olive oil, but I was *gasp* running low on it, so I used canola oil instead. Roasted garlic is a lovely thing. It's soft and sweet, and very mildly garlicky.
I made the mayonnaise in the blender. I put 2 egg yolks, a couple tablespoons of dijon mustard, a pinch of salt and pepper, 4 or 5 tablespoons of white wine vinegar, and the roasted garlic, a whole head, each clove squished out of it's skin into the blender. I blended it on medium, and when it was well mixed, I removed the little plastic thingie in the cover of the blender. While the blender was on, I poured a slow drizzled of oil into the blender through the hole in the lid. I used about 1 to 1 1/2 cups of oil.
At this point, magic happens. Yeah, I know it's more like science or chemistry, but I prefer to think of it as magic when the pale yellow egg yolk mixture meets up with the thin stream of oil and turns into a velvety, thick, smooth, garlicky mayonnaise. Heaven in a blender.

I probably should have thinned it out for use in the salad, with a bit of milk or water, but to be honest I didn't think of it until I had dropped a few dollops of it into the lettuce. It still made a lovely dressing, with fresh grated parmesan and croutons. There was lots of the mayonnaise left over. Like I said, magic.
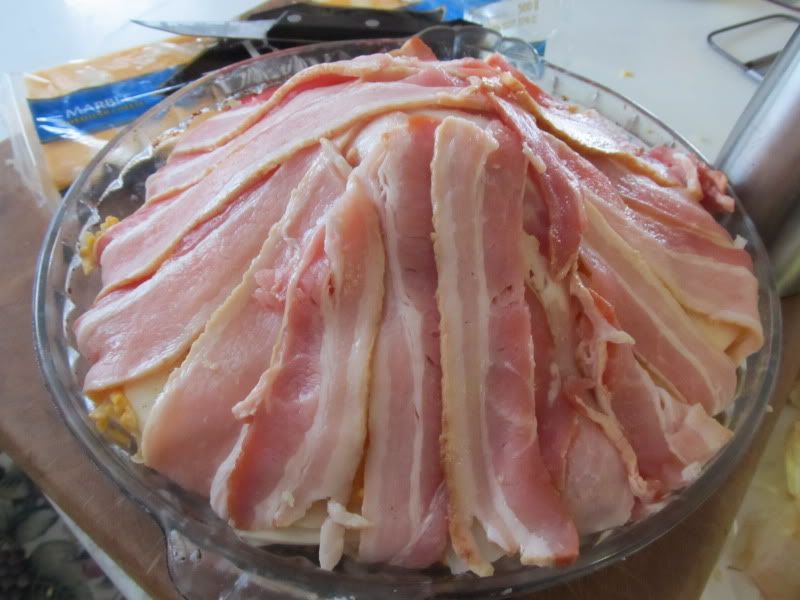
Potato Bacon Cheddar Tart - Michael Smith
Michael Smith is one of my favorite television chefs. He makes simple, delicious food, and is not only wonderfully creative, but he encourages experimentation. This, in my book, is always a good thing.
Plus, anyone who can come up with a recipe like this potato, bacon, cheddar tart has to be a foodie star. This is taken from his website. Here's the link - http://chefmichaelsmith.com/Recipe/potato-bacon-cheddar-tart/
Ingredients
2 pounds room temperature bacon
lots freshly ground pepper
4 cups shredded aged cheddar
5 or 6 large baking potatoes (unpeeled)
a sprinkle or two sea salt and freshly grated pepper
1 onion, minced
4 cloves garlic, minced
Instructions
Preheat your oven to 350°F (180°C).

Carefully arrange the bacon in a radial pattern from the centre of the bottom of a 10- or 12-inch (25 or 30 cm) round non-stick baking pan to the lower edge of the rim and continuing up and over the sides of it. Let the ends hang over. The slices should overlap slightly around the sides of the pan. To reduce the thickness of the bacon in the centre, stagger every other piece, starting it 2 inches (5 cm) from the centre and extending it further than the adjacent slices.
With the palm of your hand, flatten the centre area, leaving no gaps in the bacon. Season the bacon with lots of pepper and then sprinkle on several spoonfuls of the shredded cheddar.
Slice the potatoes as thinly and uniformly as you can, about 1/4 inch (6 mm) thick.
Arrange a circular pattern of overlapping slices around the inside bottom edge of the pan. Continue arranging overlapping layers of the potatoes until the bottom is evenly covered. Season the potatoes with salt and pepper.
Mix together the onion and garlic and sprinkle some of the mixture onto the potatoes. Continue with a layer of the shredded cheese. Cover with another layer of the potato, pressing it down firmly before continuing with alternate layers of the potatoes, onion mixture and cheese, insetting each a bit from the edge of the pan until the top is an inch (2.5 cm) or so higher than the pan’s rim. Fold the overhanging bacon neatly up and over the top of the potatoes.
Trim a small piece of parchment paper and place it in between an ovenproof lid and the bacon. This will prevent the bacons ends from pulling back and shrinking during cooking.

Place the pan on a baking sheet and bake for at least 2 1/2 to 3 hours. You’ll know it’s done when a small, thin bladed knife inserts easily.
Pour off as much of the fat around the edges as possible. Let the tart stand for 15 minutes and then invert it onto a cutting surface. Slice into wedges and serve immediately.

You may refrigerate any leftovers and reheat them later it in a microwave.
Grace, Madison and I were a bit horrified by the fact that after we were finished, there was only 1/3 of the tart left. Then I remembered that I had halved the recipe. We didn't feel like total porkers then. The garlic is a really nice touch. It would be worth adding to a regular scalloped potato dish.
Plus, anyone who can come up with a recipe like this potato, bacon, cheddar tart has to be a foodie star. This is taken from his website. Here's the link - http://chefmichaelsmith.com/Recipe/potato-bacon-cheddar-tart/
Ingredients
2 pounds room temperature bacon
lots freshly ground pepper
4 cups shredded aged cheddar
5 or 6 large baking potatoes (unpeeled)
a sprinkle or two sea salt and freshly grated pepper
1 onion, minced
4 cloves garlic, minced
Instructions
Preheat your oven to 350°F (180°C).
Carefully arrange the bacon in a radial pattern from the centre of the bottom of a 10- or 12-inch (25 or 30 cm) round non-stick baking pan to the lower edge of the rim and continuing up and over the sides of it. Let the ends hang over. The slices should overlap slightly around the sides of the pan. To reduce the thickness of the bacon in the centre, stagger every other piece, starting it 2 inches (5 cm) from the centre and extending it further than the adjacent slices.
With the palm of your hand, flatten the centre area, leaving no gaps in the bacon. Season the bacon with lots of pepper and then sprinkle on several spoonfuls of the shredded cheddar.
Slice the potatoes as thinly and uniformly as you can, about 1/4 inch (6 mm) thick.
Arrange a circular pattern of overlapping slices around the inside bottom edge of the pan. Continue arranging overlapping layers of the potatoes until the bottom is evenly covered. Season the potatoes with salt and pepper.
Mix together the onion and garlic and sprinkle some of the mixture onto the potatoes. Continue with a layer of the shredded cheese. Cover with another layer of the potato, pressing it down firmly before continuing with alternate layers of the potatoes, onion mixture and cheese, insetting each a bit from the edge of the pan until the top is an inch (2.5 cm) or so higher than the pan’s rim. Fold the overhanging bacon neatly up and over the top of the potatoes.
Trim a small piece of parchment paper and place it in between an ovenproof lid and the bacon. This will prevent the bacons ends from pulling back and shrinking during cooking.

Place the pan on a baking sheet and bake for at least 2 1/2 to 3 hours. You’ll know it’s done when a small, thin bladed knife inserts easily.
Pour off as much of the fat around the edges as possible. Let the tart stand for 15 minutes and then invert it onto a cutting surface. Slice into wedges and serve immediately.

You may refrigerate any leftovers and reheat them later it in a microwave.
Grace, Madison and I were a bit horrified by the fact that after we were finished, there was only 1/3 of the tart left. Then I remembered that I had halved the recipe. We didn't feel like total porkers then. The garlic is a really nice touch. It would be worth adding to a regular scalloped potato dish.
Sunday, January 29, 2012
The No-knead Bread Week-end
I feel like I spent the whole week-end making no-knead bread. Of course, it’s not like I’m wiped out or anything. After all, it is no-knead.

In a previous post I wrote about how I had been baking the no-knead bread wrong, which had lead to a great coconut-white chocolate bread discovery. Still, baking it the right way, in a heated pot, in a 450 F oven, makes all the difference. It's a wonderfully rustic loaf, with a substantial crust and a moist, chewy interior. Very ploughman lunch-ish.

This is my latest effort at the coconut, white chocolate bread. Only I had run out of white chocolate chips, and substituted butterscotch instead. Yeah. Not a winner. It was okay, and it is possible that I have been eating so much bread lately that I am "breaded-out" and just couldn't appreciate it as much, but it didn't taste right. The butterscotch chips aren't a subtle enough flavor to go with the coconut. The flavors aren't supposed to jump out and hit you in the face. It's supposed to be gently sweet, chewy, with vague creamy bits of milky white chocolate. Also, the butterscotch chips melted weirdly and left brown streaks in the bread. Not terribly appetizing. But, since mistakes are half the fun, I figured I'd post the pictures anyway.
The link for the no-knead recipe is http://steamykitchen.com/168-no-knead-bread-revisited.html. It's a wonderful thing. I think I'll be moving away from bread for a while, though. I want to try making a sourdough at some point. I made one years ago, and really enjoyed the yummy treats that came from it. I especially remember making lovely sourdough English muffins. For now, though, I'm a bit tired of bread. Yeah, I know. How can it be?
For supper on Saturday night, I made a potato bacon cheddar tart. I found the recipe on the Michael Smith website. I took pics, which I will post next time. Yes, it was lovely and decadent. Oooh-la-la
In a previous post I wrote about how I had been baking the no-knead bread wrong, which had lead to a great coconut-white chocolate bread discovery. Still, baking it the right way, in a heated pot, in a 450 F oven, makes all the difference. It's a wonderfully rustic loaf, with a substantial crust and a moist, chewy interior. Very ploughman lunch-ish.
This is my latest effort at the coconut, white chocolate bread. Only I had run out of white chocolate chips, and substituted butterscotch instead. Yeah. Not a winner. It was okay, and it is possible that I have been eating so much bread lately that I am "breaded-out" and just couldn't appreciate it as much, but it didn't taste right. The butterscotch chips aren't a subtle enough flavor to go with the coconut. The flavors aren't supposed to jump out and hit you in the face. It's supposed to be gently sweet, chewy, with vague creamy bits of milky white chocolate. Also, the butterscotch chips melted weirdly and left brown streaks in the bread. Not terribly appetizing. But, since mistakes are half the fun, I figured I'd post the pictures anyway.
The link for the no-knead recipe is http://steamykitchen.com/168-no-knead-bread-revisited.html. It's a wonderful thing. I think I'll be moving away from bread for a while, though. I want to try making a sourdough at some point. I made one years ago, and really enjoyed the yummy treats that came from it. I especially remember making lovely sourdough English muffins. For now, though, I'm a bit tired of bread. Yeah, I know. How can it be?
For supper on Saturday night, I made a potato bacon cheddar tart. I found the recipe on the Michael Smith website. I took pics, which I will post next time. Yes, it was lovely and decadent. Oooh-la-la
A Happy Mistake
One of the lovely things about cooking is that mistakes can lead us down an entirely new road of good things to eat. Sometimes they can even be better than what we intended to make.
A while ago, I mentioned wanting to make no-knead bread, and was sent a link to this page ~ http://steamykitchen.com/168-no-knead-bread-revisited.html~ from a dear friend. I made it once, loved it, and determined to make it repeatedly. Then it was Christmas and my baking skills were consumed with stollen and…well, basically stollen.
In January I decided to make the no-knead bread again, this time from memory as the ingredients are so simple. The bread didn’t turn out the same, though. It was a different texture, chewy and more moist with a less impressive crust than the original loaf had. It was still good, so I made it a few more times before I checked the original recipe and discovered that while I had the ingredients down, I wasn’t making the oven hot enough, and I wasn’t heating the cooking pot before dumping the dough in it to be baked. Ah, problem solved.
In the meantime, though, while eating a slice of the “mistake” bread, I was reminded of a coconut, white chocolate loaf that a bakery in one of our local grocery stores used to make. It had the same texture as the “mistake” loaves that I was making, and so one night while mixing the flour, salt, yeast and water, I added a cup of shredded coconut and half a cup of white chocolate chips to the batter. I baked it the way I had been doing it, in a 350 F oven. It was delicious.
Moist, coconutty, with just the right amount of sweetness from the white chocolate. It was especially good toasted with butter. It was a success.
So, now that I have discovered the error of my ways, my future loaves of no-knead bread will look more like those lovely, rich brown loaves on the recipe page. I’m going to make 2 loaves tonight, (one, plain no-knead and one coconut, white chocolate) and bake them tomorrow, so I will have pictures then.
In the meantime, the lesson is that sometimes mistakes can take you down a road that you never thought you’d find yourself on. I’m pretty sure that’s how snails came to be on the menu…
The Brilliant Julia Child
”
“This is my invariable advice to people: Learn how to cook — try new recipes, learn from your mistakes, be fearless, and above all have fun!”
Subscribe to:
Comments (Atom)